Showing posts with label nail art. Show all posts

Monday, February 8, 2016

Holographic Houndstooth with Sinful Colors and Colors by Llarowe

Hello, everyone! I hope you had a great Super Bowl Sunday!

I've really become a huge fan of stamping as of late and have been finding myself experimenting with a lot of different finishes and patterns. This is a fairly simple one that I wore to work last week, which everyone seemed to love.


This look was created by stamping the houndstooth pattern from the BP L-006 plate by Born Pretty in Sinful Colors Black on Black over Colors by Llarowe Chillin' in Paradise. It wasn't too overly sparkly and had a nice muted look when indoors, but a nice pop outside!


Tuesday, November 3, 2015

Zoya Stamped Paisley Flowers

Hello, everyone!

As you may have noticed on Facebook, I've finally gotten the hang of stamping now that I've found my ideal stamper, the Creative Shop Stamper! So now, I'm a stamp-a-holic!

Today's look features an early plate from when I purchased the Salon Express kit, which basically was an epic fail. However, the plates were still decent quality and featured replicas of Konad plates. This was one of those plates, so I'm not sure what the corresponding Konad plate is. If anyone knows, please comment and I'll update this post.

My favorite color is purple, so I wanted to do something monochromatic for work this week. I wound up using Zoya Julie as the base and Zoya Belinda for the design. I think I would have liked the design to be a bit darker, but I really attribute that more to the thinness of the lines in the pattern, rather than the polish itself.


What do you think of this color and design combo?

Everyone at the office went crazy over it this morning!

Sunday, April 5, 2015

Easter Chevrons


Happy Easter, my lovelies!


For my Easter nails, I used two different sized Chevron nail vinyls over a base of OPI Skull and Glossbones, plus Colors by Llarowe Good Fortune and Smooth Criminal.

I really loved how this came out. It's sparkly and pretty and very springy!

Monday, March 16, 2015

Barielle Gentle Breeze Watercolor Water Marble


I haven't done a water marble in what seems like FOREVER, so I decided when I received the Barielle Gentle Breeze collection for spring 2015, I would have to give it a shot!

According to Barielle, the Spring collection "reflects the soft, gentle, eclectic hues of this most welcome and delightful season." It is definitely atypical of other brands' spring collections, but that's not really a bad thing.


Under the Sea - A rich, sea scuba blue shimmer
Champagne and Bubbles - A creamy tangerine
Pink Parasol - A creamy strawberry ice
Gray Sky - A rich, creamy glacier gray
Heaven Sent - A soft creamy aquamarine

Prior to starting the water marbling process, I painted on two coats of Under the Sea as the base.

I initially didn't intend for this to have a very soft, watercolor look, but a few of these shades (Champagne and Bubbles, Under the Sea, and Heaven Sent) are on the sheerer side.


I really loved how this came out, even though the colors bled together. It actually made a pretty watercolor effect!


I am TOTALLY in love with this water marble. I wore it for a full week before I managed to take it off!

The Gentle Breeze collection is available from Barielle as a set for $25 USD.

What do you think of this watercolor look?


Disclaimer: The product(s) in this post were provided to me by the manufacturer or their PR company for consideration. For more information please visit my Disclaimer page. 


Tuesday, February 24, 2015

Parks and Recreation Sunflower Painting Nail Art


Tonight is the final episode of Parks and Recreation, a show I started watching two years ago and fell in LOVE with. In honor of the series finale, I am following the trend set by Emily over at The Lacquerologist and showing my love for Ben, Leslie, and the rest of the Parks and Rec crew with my nail art!

One of my hands down favorite episodes is actually a two-partner in which Ben and Leslie get married. The final shot of them after they actually tie the knot is them in front of their favorite painting in the building:


So I tried to do a little take on sunflowers of my own, incorporating the golden tones, as well as the purplish flowers that pepper the painting, as well.


I used acrylic paints for this flowers in yellow, peach, and orange, as well as purple. The base is Colors by Llarowe Beam Me Up Scotty.

If you're a Parks and Rec fan, are you as devastated by the end of the series as I am?

Saturday, February 21, 2015

NJ Pet Expo and 101 Dalmatians Nail Art


Two weekends ago was the New Jersey Pet Expo and I attended for the second time. Last year, I had just adopted Pebbles (read all about her story here) the week before, so I stocked up on some goodies for her.

This go around, we now have Dakota, Pebbles, and Brynn (who we permanently adopted last March), so I stocked up on some toys, treats, and a couple of new collars. Those collars are so pretty... I'm sure I'll be using them as inspiration for some manicures

So in honor of Pet Expo, I did a little 101 Dalmatians nail art!


I used Revlon Gold Coin, Milani Spotlight White, Zoya Breezi, Zoya Rehka, and Zoya Raven to make this nail art, along with gray striping paint.

This was extremely labor-intensive, but I'm happy with how it came out. What do you think?

Saturday, February 14, 2015

Valentine's Day and Anti-Valentine's Day Nail Art

Happy Valentine's Day, everybody!

Unfortunately (or fortunately, depending on how you look at it), I'm still recovering from both my surgery and the flu, so I can't stomach any chocolate or other candy. However, that doesn't mean I can't celebrate the holiday with a little sparkle!

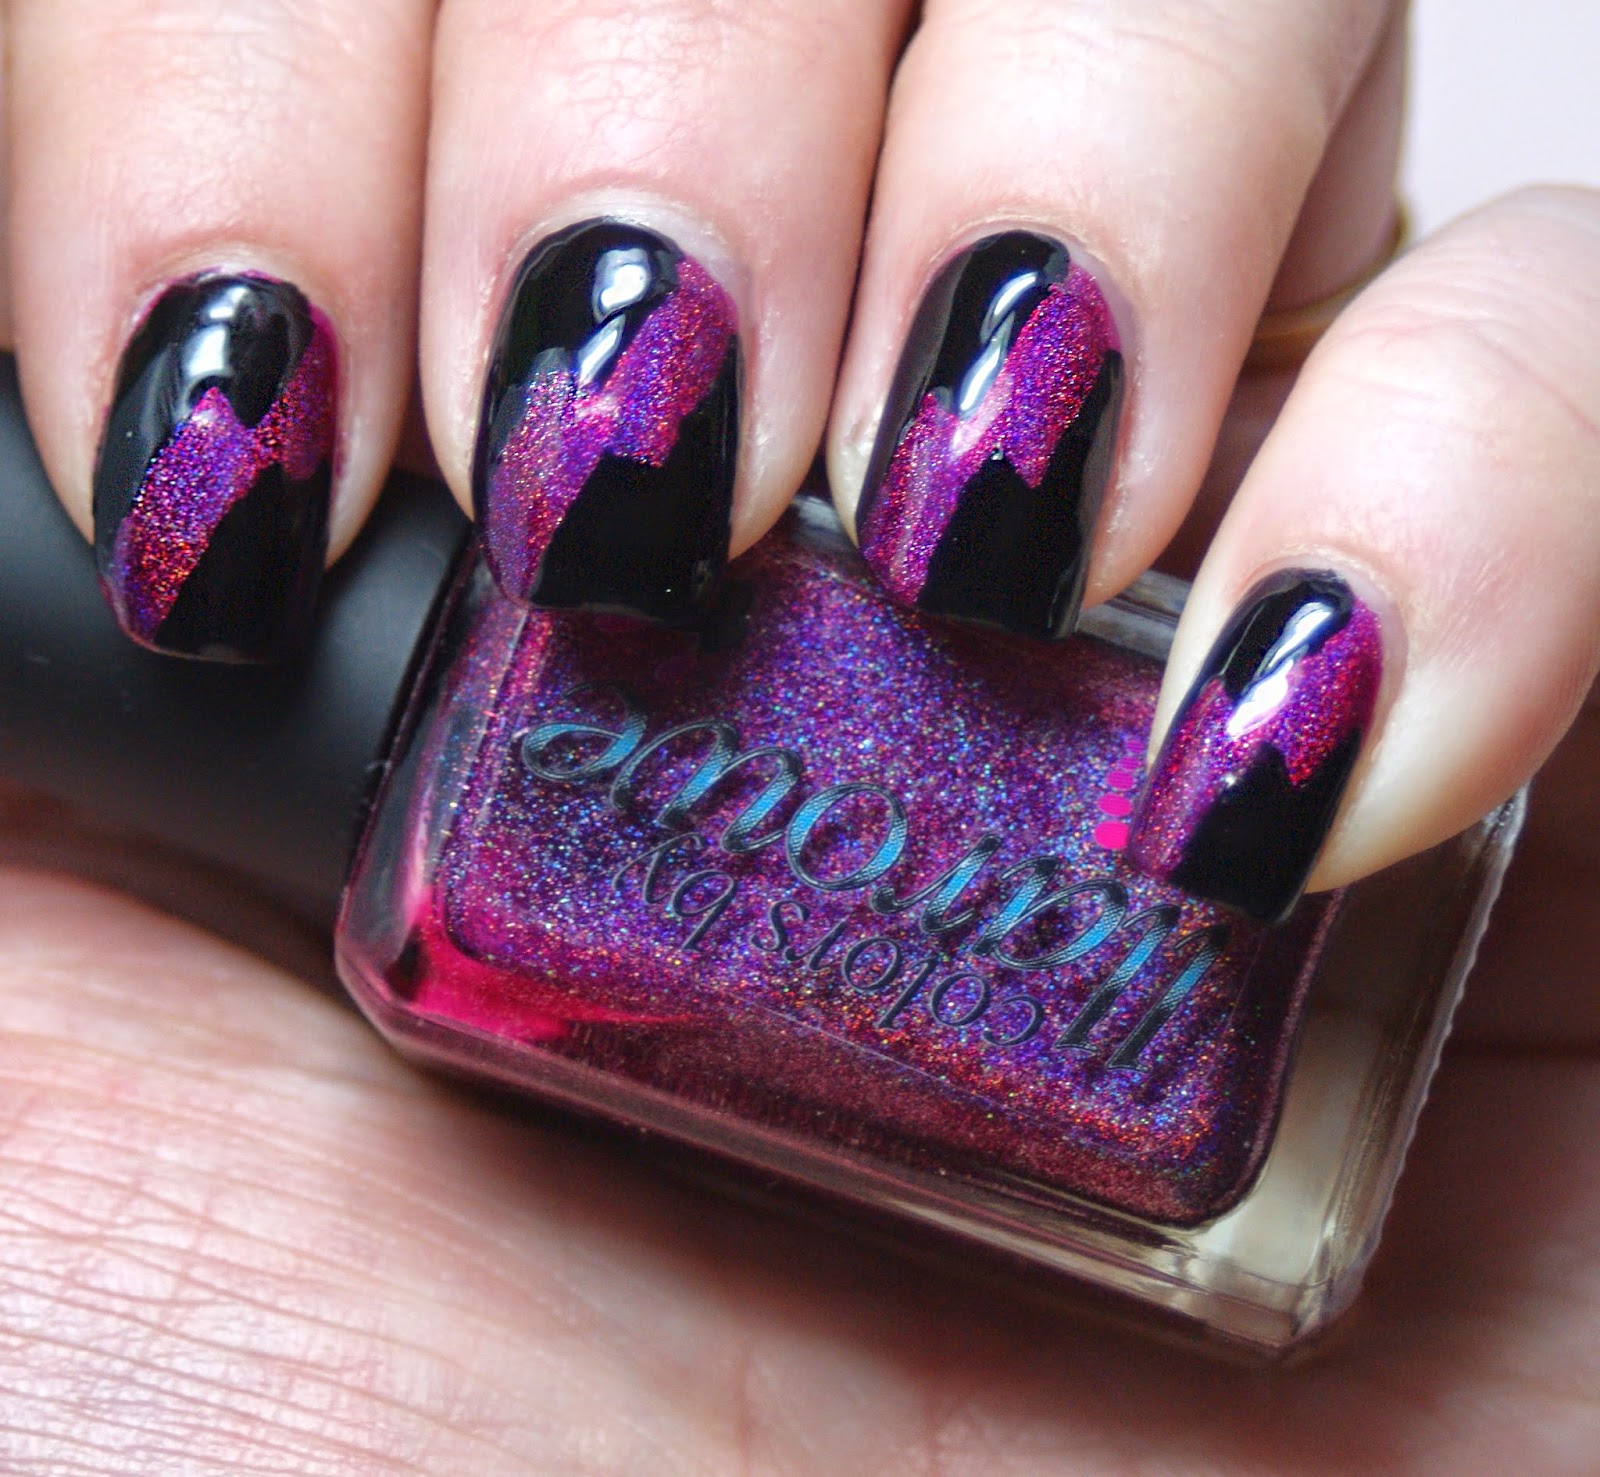
When I asked over on the Princess Polish Facebook page what you all wanted to see from my Valentine's Day manicure this year, it seemed lots of you wanted something non-traditional, possibly holographic. So I came up with something that could be both in celebration or opposition of the holiday, depending on how you look at it!


The base color is Colors by Llarowe Dirty Diana with Sinful Colors Black on Black on top.

I thought that the slash of magenta could be something sassy and fierce for a night out with a special someone, but also could be anti-Valentine's Day because it reminds me of a broken heart.


I was really happy to rock this look at least for a day around school and work. Unfortunately, being sick meant I basically was the only one who got to stare at it this week. But oh well! Now you all can see it too!

Would you wear this non-traditional mani?

Monday, February 2, 2015

Milani Fierce Foil Nail Lacquer Snowflake Nail Art


While swatching the brand new Milani Fierce Foil collection, I found my snowflake nail vinyls and thought that the colors would lend themselves nicely to a little winter nail art.

For this look, I used Milani Venice and Rome:


Milani Venice is a cobalt blue metallic polish that I used for the snowflakes and Milani Rome is a metallic orchid that I used as the base.


I really liked how wintery these came out with the combination of colors, but also the metallic shimmer. It's still colorful, but icy in a way. I really loved it.

And even though these are metallic, I had no issues with staining or removal. These came off really easily.

Stay tuned for a full review of the entire Milani Fierce Foil Nail Lacquer collection later this week! In the meantime, you can find these two shades at your local CVS for $3.99. But act fast! These are limited edition!


Disclaimer: The product(s) in this post were provided to me by the manufacturer or their PR company for consideration. For more information please visit my Disclaimer page. 

Sunday, February 1, 2015

Seahawks Blue and Green Nail Art


Last night on Facebook, I asked whether everyone was rooting for the Seahawks or the Patriots and the results were overwhelming. It seemed like most people were on the Russell Wilson train!

I, too, am rooting for the Seattle Seahawks, so I decided to do a little nail art with a few of the holo polishes I recently received in a swap.


I used Milani Spotlight White for the base with Colors by Llarowe Bronco Blue (ironic, I know) and Young Grasshoppa.

All of these were made using nail vinyls from Up Your Nail. The thumb and ring finger were with vinyls, the other three were made using their nail guides. The only one I struggled with a little was the teardrop guide, but I figured it out a little better after a redo.

Please let me know what you think of my Super Bowl nail art and feel free to post your nail art to my Facebook page. I'll be sharing some of my favorites throughout the game!

Monday, January 26, 2015

Up Your Nail and Holo Nail Art


Happy Saturday! Today is my first new post since I've gotten home from the hospital and I'm really glad to say that I'm starting to feel leaps and bounds better than my first day after surgery. My pain is minimal and I'm sleeping through the night, plus most of my nausea is completely gone! Woo hoo!

This post features two of my favorite things: holographic polishes and nail vinyls.

The nail vinyls used to make this manicure were fancy chevrons from Up Your Nail. Up Your Nail is pretty much my go-to store for the vinyls because their prices are ridiculously awesome. These chevrons came in my mystery bag but are 100 vinyls for $2.50. I haven't seen anyone else's prices come remotely close to that!


To achieve this look, I used three coats of Layla Ocean Rush as my base with one coat of a-England Tristam on top. I like the look of the scattered holo on top of the linear holo, though I'm interested to see how this would have turned out with two linears.

What's your verdict on this color combo and pattern? Have you tried Up Your Nail?

Wednesday, January 7, 2015

Zoya Loredana with Studs


Hello, everyone! I just picked up some awesome clearance stuff while at Ulta, including backups of the Zoya MatteVelvet Collection and a nail wheel of studs. Both were on clearance for 50% off!

I thought it would be kind of cool to play with the matte silver metallic look of Zoya Loredana with the shiny gold metallic pop of the square studs.


The above is with three coats of Loredana. In order to make the studs stick (because they're concave), I had to apply top coat to my ring finger before applying the studs. After I felt the top coat was dry and the studs were secure, I went back over the polish with a matte top coat. I honestly wouldn't notice the difference.

Will you try the mixed metallic look anytime soon?

Tuesday, January 6, 2015

How to Spruce Up a Boring Mani with Simple Nail Art!


I don't know about you, but even if my manicure lasts for DAYS, I find myself bored by the third day of rocking the same color, no matter how pretty it is. So here, I have for you some very simple ways of jazzing up your manicure without having to change polish. This also works for adding a little something extra when the weekend rolls around.


I have broken down the techniques from beginner to intermediate to advanced to expert, but one thing is for certain: no matter what your skill level is, you'll always be able to show off some fantastic fingers!

Beginner Level: Polka Dots!

Thursday, December 18, 2014

Milani Candy Cane Nails

Happy Friday, everybody!

With Christmas officially less than a week away, I figured it was high time for some Christmas nail art! So with a little help from the straight nail vinyls from NailVinyls.com and a pair of Milani Color Statement shades, I whipped up some candy cane nails!


For this manicure, I used Milani Iconic Red and Spotlight White.

Here are a few helpful tips if you want to recreate this look:

1. Paint the white for your base color and apply the red over the nail vinyls. I made the mistake of painting red as my base and it was a lot of work getting the white opaque. So save yourself the hassle and don't do it!

2. When using nail vinyl lines or striping tape, paint in the direction of the pieces. I achieved FAR cleaner lines when I applied the polish on a diagonal than when I just applied the polish in a vertical line from bottom to top.

3. Wait at least 20 minutes for the polish to dry before applying a top coat. I know that seems like a long time and the Milani Quick Dry top coat is amazing, but your colors WILL smear if you don't wait at least that long. Seriously. Hold out as long as you can. Nothing is more aggravating than having beautiful stripes and screwing it up after such hard work.

Feel free to post your Candy Cane nails to the Princess Polish Facebook page to show them off!

Thursday, November 6, 2014

Green and Yellow Polka Dots


Happy Thursday, everybody! Today I have some quick and simple nail art to show you. It's not very complicated to replicate, but I really liked this color combination.


For my base green, I used Barielle Do Unto Others and my yellow polka dots are SinfulColors Gel Shine Bananappeal. It's pretty much my go-to yellow because it's very opaque. I struggle to find yellows that aren't sheer for the purposes of nail art. This was vivid and perfect!

Polka dots have become my default nail art because it's so easy to just throw on to change up a look with minimal dry time.

Until tomorrow!

Wednesday, November 5, 2014

Frozen Elsa Holographic Gradient


For those of you who have been following me for a while below nails may not look very familiar to you. There's a very good reason for that!

My younger sister is fourteen and decided to dress up as Elsa from Frozen for Halloween. She wanted something that was Elsa-like on her nails and had previously asked me to create a gradient on her nails for a while. So I figured now was as good of a time as any!

I wanted to use something holographic to create an icy look, like how snow and ice glisten in the sunlight. And of course, who can resist rhinestones?


I used four shades for this blue holographic gradient. From dark to light: Zoya Dream, OPI Blue Chips (aka: OPI The Flowers are Blue-Ming), Wet n Wild Who Wants to Be a Millionaire, and OPI DS Shimmer.

I used a bit different of a technique for this gradient than I've used in the past. Normally, I sponge on one color at a time, however, I decided to try a different method. This time, I painted on Who Wants to Be a Millonaire as a base coat and painted the gradient onto a makeup sponge, then dabbed that on my nail.
 
It needed a few touch ups, but I was happy with it and my sister was over the moon.

I added some bling in the form of a rhinestone snowflake... unfortunately, one fell off sometime between the night I painted them and the afternoon I took the picture, but it's still blingtastic to me!

What do you think of this blue holo gradient? Did I do Elsa proud?

Thursday, October 30, 2014

Zoya Bruised and Bloody Nail Art

Happy Halloween, my lovelies! May your day be filled with lots of treats and not only a moderately acceptable amount of screaming, sugared-up children!

My NOTD in honor of this holiday uses the classic blood drip look, but with a little something extra.


By sponging a little Zoya Cynthia around the border of my nail, over a coat of Zoya Audrey, and topping it off with Zoya Rekha for the blood, I created something a bit spookier than usual. Perhaps, Zombie-like?

What do you think of my subtle twist on a Halloween classic manicure?

Thursday, October 23, 2014

Swatch and Review: Milani Sheer Nail Art

Happy Thursday, everyone! It's almost the weekend!

Today, I have some quick nail art to show you! Normally, I don't do your typical French manicure with white and sheer shades. But when I was provided the Milani Color Statement collection for review, I knew I had to put my own spin on the Classic French Manicure.


To achieve this update French, I used three coats of Milani Lady-like Sheer for the base color with two coats of Milani Frenchie Sheer to paint on the French tip. Then I used black acrylic paint to make the flower petals, the arches, and the dots, the latter using a dotting tool. Of course, I used two rhinestones, as well.

I was surprised at how well Frenchie Sheer built up. The Lady-like Sheer was a little streaky at first, but with three coats, I got it under control.

The new Milani Color Statement line is now available at CVS stores for just $3.99 or from Milani’s website HERE at just $3.99 each.

Keep an eye out for more swatches of the Color Statement polish collection!

Disclaimer: The product(s) in this post were provided to me by the manufacturer or their PR company for consideration. For more information please visit my Disclaimer page.


Wednesday, October 8, 2014

Milani Red Chevron Gradient

Happy Hump Day, everybody!

While I'm in prepping mode for NYC Comic Con, I thought I'd post some nail art using three of the new red shades from the Milani Color Statement Collection.

I've actually never worn chevrons (I KNOW, RIGHT?!?), so I thought I'd do a bit of a chevron gradient because there were a ton of beautiful reds in this collection. I have four more to show you still!


From cuticle to tip, I used Enchanting, Modern Rouge, and Red Label.

Enchanting is a gorgeous blackened-red, bordeaux cream, Modern Rouge is a rich cherry red cream, and Red Label is a bright tomato red cream.

I only needed one coat of Enchanting to achieve opacity, while I needed two coats each of Modern Rouge and Red Label.

These are PERFECT colors for the fall!

The new Milani Color Statement line is now available at CVS stores for just $3.99 or from Milani’s website HERE at just $3.99 each.

Keep an eye out for a future review of the remaining reds in the Color Statement polish collection!

Disclaimer: The product(s) in this post were provided to me by the manufacturer or their PR company for consideration. For more information please visit my Disclaimer page.

Monday, September 29, 2014

Milani Monday: Funky Teal Daisies


It's a Milani Monday here at Princess Polish! I'm decided to use two of the green-leaning shades from the new Color Statement collection, along with a little gold, to create a look similar to the Antique Flowers I tried last week.


I used Mint Crush for the base, which you can see is a pastel mint cream. Then I used Tattle Teal for the flowers and Gilded Rocks for the center of the flowers.

The new Milani Color Statement line is now available at CVS stores for just $3.99 or from Milani’s website HERE. Truly, these are a great value at just $3.99.

Stay tuned... more Color Statement polish reviews are on their way!

Disclaimer: The product(s) in this post were provided to me by the manufacturer or their PR company for consideration. For more information please visit my Disclaimer page.

Monday, September 15, 2014

Zoya Antique Daisies Nail Art

Happy Monday, everybody!

Here's a quick nail art post to kick off the week, featuring some bright and happy shades from Zoya.


This look was fairly easy to achieve with the use of a dotting tool. The base color is Zoya Jacqueline, while the flowers were made using Zoya Breezi for the petals and Zoya Pippa for the centers.

I liked how Jacqueline as a base color gave this look a very antique-y, but delicate feel.

The flowers maybe took me about fifteen minutes in total and most of that time was spent dipping and cleaning the dotting tool so that there wasn't a build up of thick, gooey polish.

What do you think of this look? Is this something you'd be willing to try yourself?